Weekly Project 5: Sequilize.js Up and Running
30 Aug 2016Sorry for the delay, I’ve been very busy lately. I haven’t done a lot of work on the YelpCamp app from last week. I went back and did a lot of work on the project form week 3. I’m very pleased with that website, but it needs more work before I can update it. The biggest downside of that website is that it uses MongoDB for the database. I’m not trying to bash Mongo, but all the work we do at NDOW relies on SQL databases, and our long term data wharehousing is a SQL database. So for the last several days I’ve been trying to figure out the Sequilize.js library.
I’ve learned quite a bit about JavaScript over the last few weeks, but jumping head first into Sequelize has been difficult. The documentation is great, but there isn’t a great bare bones example of integrating Sequelize with Express. A lot of the examples out there (here, here, and here) are wonderful examples of Sequelize. However they all use other tools that I haven’t learned yet (Gulp, Angular, etc.). I understand why these tools are being used, but my primary focus is learning JavaScript and building websites/apps that help will help me build useful tools for NDOW. So vanilla Node, Express and Sequelize is all I’m trying to learn right now.
Sequelize.js
Sequelize is a promise-based ORM (object-relational model) for Node.js. It supports most SQL dialect, including PostgreSQL, MySQL, SQLite, Micorsoft SQL Server, and MariaDB. In this post I will be connecting with Postgres.
PostgreSQL
Postgres is another flavor of SQL. It is open-source and there is a large community out there that uses it. You will need Postgres on your computer to use Sequelize. I downloaded Postgres with homebrew. If you are on a Mac you can use the Postgres.app. Good luck if you are on a PC, if you are on Linux you probably already know how to get it.
Setup
Create a new folder, cd into it, then use npm to install and setup the environment.
$ mkdir ~/documents/express-sequelize
$ cd ~/documents/express-sequelize
$ touch app.js

$ npm init
$ npm install express sequelize pg body-parser faker
After running these commands your directory structure should look like this (very simple).
.
|-- app.js (all code will go in here)
|-- package.json
|-- node_modules
    |-- all node modules will be in here
app.js and configuration
The next step is to require the packages and configure the app to use the required resources and database.
var express = require('express');
var Sequelize = require('sequelize');
var faker = require('faker');
var bodyParser = require('body-parser');
var app = express();

// app configuration
app.use(bodyParser.urlencoded({extended: true}));
app.use(bodyParser.json());

// connect to database (user your username and password)
var sequelize = new Sequelize('testdb', 'username', 'password', {
    dialect: 'postgres'
});

app.listen(3000, function(){
    console.log('app listening on port 3000');
});
The testdb will need to be created before the connection can be made. To do this open another terminal tab (cmd + shift + t) and type the following to start the Postgres command line interface, create a database and connect to the created database
$ psql
=# create database testdb;
=# \c testdb
Creating a Model
Create a simple model to test out the functionality. The model with be a User model with a first name, last name and email. Very simple. I used faker to fill these fields with generated data.
var User = sequelize.define('user', {
    first_name: Sequelize.STRING,
    last_name: Sequelize.STRING,
    email: Sequelize.STRING
},{
    underscored: true
});
User.sync().then(function(){
    User.create({
        first_name: faker.name.firstName(),
        last_name: faker.name.lastName(),
        email: faker.internet.email
    });
});
When defining a model there are serval options you can provide after the schema. underscored: true means that Sequelize will undersore all the table field names. This is important because PostgreSQL doesn’t support capital letters as field or table names.
User.sync() will sync the model with the tables in the database. If the table doesn’t exist it will be created. You can provide the option User.synd({force: true}) which will delete then recreate the table if it already exists.
If you switch over to the psql terminal tab and run select * from users; you should see similar output to below. Notice that sequelize add the columns created_at and updated_at. If you hadn’t specified underscored: true these would be created as createdAt and updatedAt.
=# select * from users;
 id | first_name |  last_name  |              email              |         created_at         |         updated_at
----+------------+-------------+---------------------------------+----------------------------+----------------------------
  3 | Griffin    | Leuschke    | George6@hotmail.com             | 2016-08-30 09:22:44.784-07 | 2016-08-30 09:22:44.784-07
  4 | Kiera      | West        | Terrence_Block84@gmail.com      | 2016-08-30 09:26:05.732-07 | 2016-08-30 09:26:05.732-07
RESTful Routes
Next I created the standard RESTful routes to test how the Sequelize works in the express framework.
// INDEX - show all users (get)
app.get('/users', function(req, res){
    User.findAll().then(function(users){
        res.json(users);
    });
});

// SHOW - show one user (get)
app.get('/users/:id', function(req, res){
    User.findById(req.params.id).then(function(user){
        res.json(user);
    });
});

// CREATE - create new user(post)
app.post('/users', function(req, res){
    User.create({
        // data to create a new use in the database
        first_name: req.body.first,
        last_name: req.body.last,
        email: req.body.email
    }).then(function(user){
        res.json({
            message: 'User Created',
            created: user
        });
    });
});

// PUT - update an existing record (update)
app.put('/users/:id', function(req, res){
    User.update({
        // data to update to user
        first_name: req.body.first,
        last_name: req.body.last,
        email: req.body.email
    }, {
        // find the current user in the database to update
        where: {id: req.params.id}
    }).then(function(user){
        res.json({
            message: 'User updated',
            updated: user
        });
    });
});

// DELETE - delete user (delete)
app.delete('/users/:id', function(req, res){
    User.destroy({
        // find the current user in the database and delete
        where: {
            id: req.params.id
        }
    }).then(function(deleted){
        if(deleted === 1){
            res.json({message: 'Successfully deleted!'});
        }
    });
});

app.listen(3000, function(){
    console.log('app listening on port 3000');
});
Each route has a Sequelize function that will do what the route say will happen.
| HTTP | URL | Action | Sequelize |
|---|---|---|---|
| GET | /users | index | User.findAll() |
| GET | /users/:id | show | User.findById() |
| POST | /users | create | User.create() |
| PUT | /users/:id | update | User.update() |
| DELETE | /users/:id | destroy | User.destroy() |
At the very end I started a node server to accept request. The easiest way to test how this works is to use Postman
Testing with Postman
Postman is a great app for testing http requests. It is available as a Mac app or Chrome app. Check the photos below to see how to use Postman.
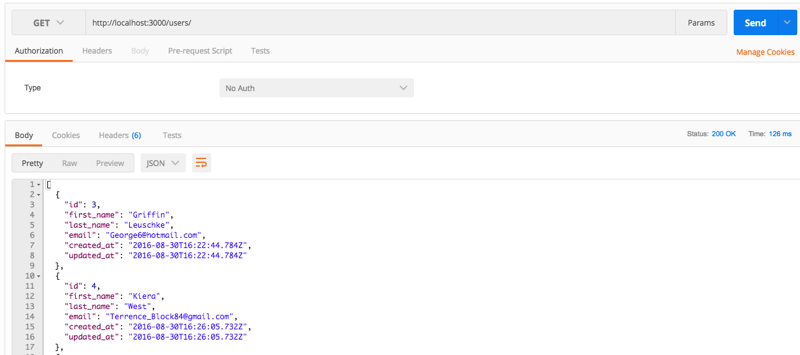
Index route.
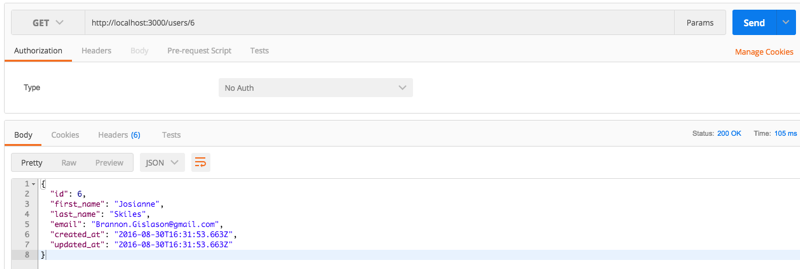
Show route for id = 6
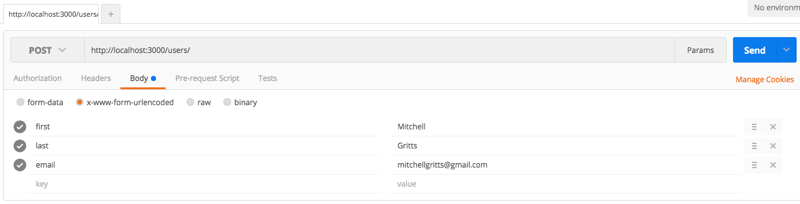
Create a new user.
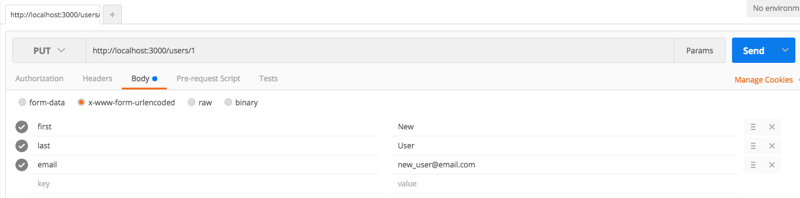
Update a user.
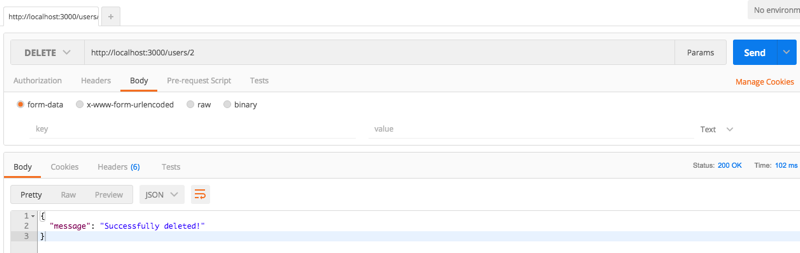
Delete a user.
Wrap
Without all of the extra libraries that all the tutorials I’ve seen Sequelize is very easy to use and set up. Over the next several days I’m going to be working on associations and relationships, migrations and refactoring. At some point I will use Gulp and Sequelize-CLI, but for now building up like this is working well for me.
The code for this post is here, it is inside the repo for the next post.